Your floors cover every square foot of your home, yet most homeowners only think about upgrading them when the damage is impossible to ignore. A good residential floor upgrade guide does more than list materials. It helps you avoid the costly mistakes that come from skipping subfloor prep, misjudging your skill level, or picking the wrong material for the wrong room. This guide covers everything: flooring types, preparation steps, real cost comparisons for DIY versus professional installation, and how to keep your new floors looking great for years. By the end, you will know exactly how to plan and execute your upgrade with confidence.
Table of Contents
- Key takeaways
- Your residential floor upgrade guide to materials and costs
- Preparing your subfloor and planning your project
- DIY vs professional installation
- Step-by-step floor installation process
- Maintaining your floors after installation
- My honest take on DIY versus professional flooring
- Ready to transform your hardwood floors?
- FAQ
Key takeaways
| Point | Details |
|---|---|
| Match material to the room | Choose flooring based on moisture levels, foot traffic, and whether comfort or durability matters most in that space. |
| Subfloor prep determines success | A flat, dry subfloor prevents cupping, buckling, and premature wear before a single plank goes down. |
| DIY saves money but costs time | You can save $1,500 to $4,000 on labor, but DIY projects often take weeks and carry real risk of costly errors. |
| Plan 6 to 12 months ahead | Early planning improves contractor availability, pricing, and material lead times for a smoother project. |
| Maintenance protects your investment | Regular cleaning routines and timely professional refinishing extend floor life by decades on hardwood surfaces. |
Your residential floor upgrade guide to materials and costs
The single biggest decision in any floor upgrade is what you put down. Every material has a different personality in terms of cost, durability, and where it works best.
Hardwood remains the gold standard for living rooms, dining rooms, and bedrooms. Hardwood is preferred for its warmth, character, and ability to be sanded and refinished multiple times. Solid hardwood typically costs $6 to $12 per square foot for materials, plus installation. The long-term value it adds to resale price is hard to beat.
Engineered wood gives you the look of hardwood with better dimensional stability in humid environments. It works well over concrete slabs and in below-grade installations where solid wood would warp. Material costs run $3 to $10 per square foot.
Luxury Vinyl Plank (LVP) has genuinely changed the affordable floor upgrade conversation. It is waterproof, scratch-resistant, and comfortable underfoot. For bathrooms, laundry rooms, and basements, LVP is the smart call. Expect to pay $2 to $7 per square foot for materials.
Laminate looks like wood but cannot be refinished. It is budget-friendly at $1 to $5 per square foot, but moisture is its enemy. Use it in low-humidity rooms only.
Porcelain tile is the right choice for kitchens, bathrooms, and high-traffic wet rooms. It is virtually indestructible but cold underfoot and harder to install without professional help.
Carpet still makes sense in bedrooms and basement playrooms where softness and sound insulation matter more than durability. Costs vary widely from $1 to $8 per square foot.
Here is a quick comparison to guide your decision:
| Material | Cost per sq ft (materials) | Best rooms | Durability | Refinishable? |
|---|---|---|---|---|
| Solid hardwood | $6 to $12 | Living room, bedroom | Very high | Yes |
| Engineered wood | $3 to $10 | Any floor level | High | Limited |
| LVP | $2 to $7 | Bathroom, basement, kitchen | High | No |
| Laminate | $1 to $5 | Bedroom, living room | Medium | No |
| Porcelain tile | $3 to $10 | Kitchen, bathroom | Extremely high | No |
| Carpet | $1 to $8 | Bedroom, playroom | Medium | No |
For a deeper look at how hardwood stacks up against epoxy coatings, the hardwood vs epoxy comparison on the Polishedjemmfloor website is worth your time.
Preparing your subfloor and planning your project
Most installation failures trace back to one root cause: a subfloor that was not ready. This step is where experienced installers earn their pay, and where DIY projects most often go wrong.
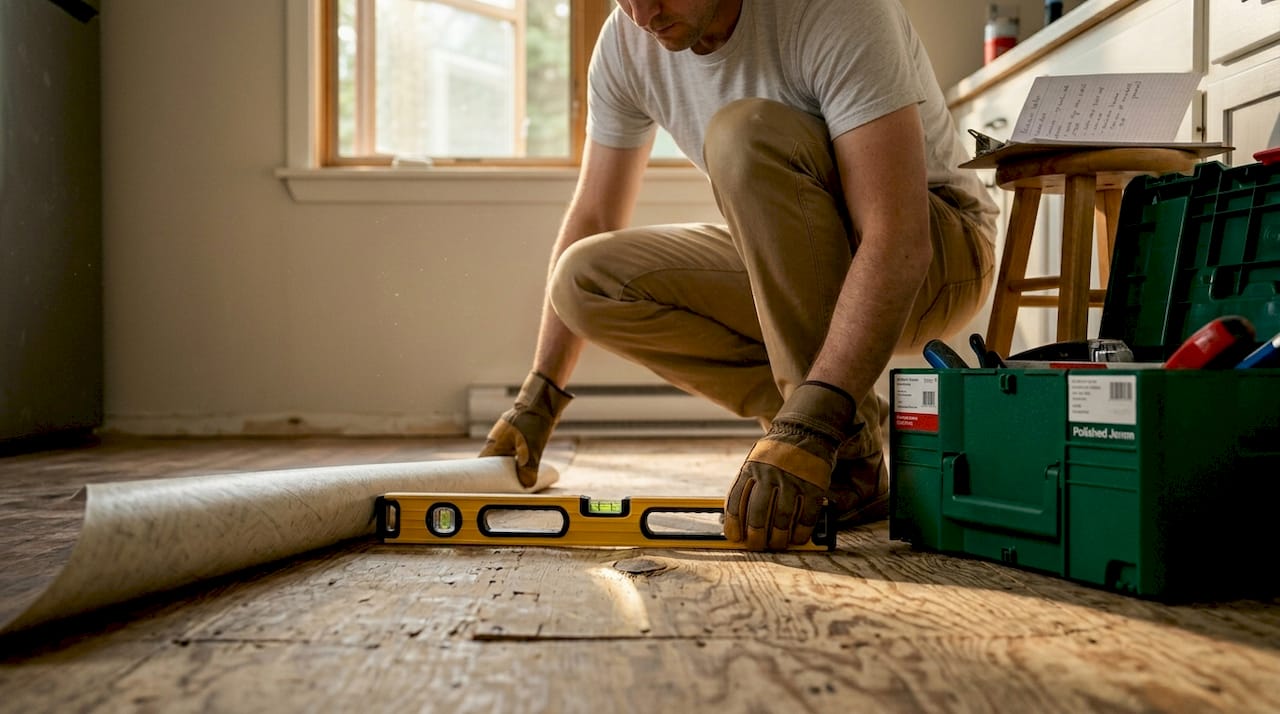
Subfloors must be flat within 3/16 inch over 10 feet. If your subfloor has high spots or low spots beyond that tolerance, planks will flex, squeak, or separate at the joints. Use a 10-foot straightedge to check flatness before you do anything else. Fill low spots with floor leveling compound and sand down high spots.
Moisture is the other non-negotiable. ASTM F2170 RH probe testing in concrete slabs is more reliable than older calcium chloride methods. It measures in-situ relative humidity inside the slab rather than just at the surface. For engineered wood over concrete, slab humidity must stay below 75 to 80% and moisture vapor emission must be under 3 lbs per 1,000 sq ft per 24 hours. If your slab exceeds those numbers, switch to LVP.
Acclimation matters just as much. Acclimation must be condition-based, not simply a matter of waiting a set number of days. The job site must hold 60 to 80°F and 30 to 50% relative humidity until the flooring reaches equilibrium moisture content. A hygrometer costs about $20 and can save you thousands in post-installation failures.
Pro Tip: Define your project goal before you buy a single board. Planning for resale versus long-term occupancy should directly influence your material choice, finish color, and even the timing of your project. Planning 6 to 12 months ahead improves scheduling and pricing.
A few key prep steps before installation begins:
- Test subfloor moisture with ASTM-standard RH probes on concrete or a pin-type meter on wood subfloors
- Check flatness across multiple directions with a 10-foot straightedge
- Repair squeaks, loose fasteners, or soft spots before laying anything down
- Select underlayment based on flooring type (foam for LVP, rosin paper for nail-down hardwood, moisture barrier for concrete installations)
- Acclimate materials in the installation space with stable temperature and humidity
DIY vs professional installation
Cost is the main reason homeowners attempt DIY flooring installs. Labor costs run $2 to $10 per square foot for professional installation. On a 500-square-foot room, going DIY can save $1,500 to $4,000 in labor alone. That is real money, and for straightforward LVP or laminate installs, a patient homeowner can absolutely pull it off.
The catch is time and skill. Professional installers finish most projects in 1 to 3 days. DIY attempts on the same footage often stretch to several weekends, and mistakes made on day one may not show up until the job is done. Fixing them means starting over.
Here is where the two approaches differ most:
| Factor | DIY | Professional |
|---|---|---|
| Labor cost | $0 (your time) | $2 to $10 per sq ft |
| Project duration | Days to weeks | 1 to 3 days |
| Skill required | Moderate to high | Handled by installer |
| Warranty | Often voided by DIY | Typically included |
| Error risk | High without experience | Low |
| Best material fit | LVP, laminate, simple tile | Hardwood, wide plank, herringbone |
Pro Tip: A hybrid approach can work well for budget-conscious homeowners. Do the demo yourself, including removing old carpet or tile and disposing of materials. Then hire a professional for the actual installation. This hybrid approach can cut total cost by 15 to 25% without sacrificing the quality of the finished floor.
Wide solid hardwood planks over 5 inches deserve special mention. Glue-assist installation is recommended by NWFA guidelines for planks of this width to limit seasonal movement. This technique involves both mechanical fasteners and adhesive. Most DIY installers skip this step because they do not know it exists. For more on what professional floor care actually delivers, the Polishedjemmfloor guide on professional floor care explains the value clearly.
Step-by-step floor installation process
Knowing the sequence prevents the most common and expensive errors. Here is the core workflow regardless of material:
- Clear and prep the space. Remove furniture, pull up existing flooring, and clean the subfloor down to a bare surface free of adhesive residue and debris.
- Flatten and treat the subfloor. Fill low spots, sand high spots, and apply a moisture barrier on concrete if required.
- Acclimate the flooring. Bring materials into the room and let them reach equilibrium moisture content under controlled conditions.
- Plan your layout. Dry-fit a row or two before committing. Start from the straightest wall and account for expansion gaps at all perimeters.
- Install the first rows carefully. These set the alignment for the entire floor. Use a chalk line. Rushing this step is the most common DIY mistake.
- Continue installation using the correct method. Nail-down for solid hardwood, click-lock for LVP and engineered, thin-set mortar for tile.
- Cut and fit perimeter pieces. Use a miter saw for straight cuts and a jigsaw for obstacles like door casings and vents.
- Install transitions and moldings. T-moldings, reducers, and quarter-round pieces finish the edges and allow for proper expansion.
- Final inspection. Walk the entire floor pressing on each plank. Listen for hollow spots or squeaks that indicate bonding issues.
Here is a quick tool reference by material:
| Material | Key tools needed |
|---|---|
| Solid hardwood | Flooring nailer, mallet, chalk line, moisture meter |
| LVP / laminate | Pull bar, tapping block, utility knife, spacers |
| Tile | Tile saw, notched trowel, level, grout float |
| Engineered wood | Click-lock or flooring nailer, rubber mallet |
Never skip the expansion gap. Flooring expands and contracts with seasonal humidity changes. A minimum 1/4-inch gap at all walls and vertical surfaces is required for wood-based floors. Filling that gap or forgetting it causes buckling within the first year.
Maintaining your floors after installation
The first six months after installation are the most critical. Your floors are acclimating to real living conditions, and small issues caught early are inexpensive to fix. Issues ignored become structural problems.
For hardwood and engineered wood, dry mopping daily and damp mopping with a pH-neutral cleaner weekly prevents grit from acting like sandpaper underfoot. Never use steam mops on wood floors. The moisture penetrates finish seams and swells the wood.
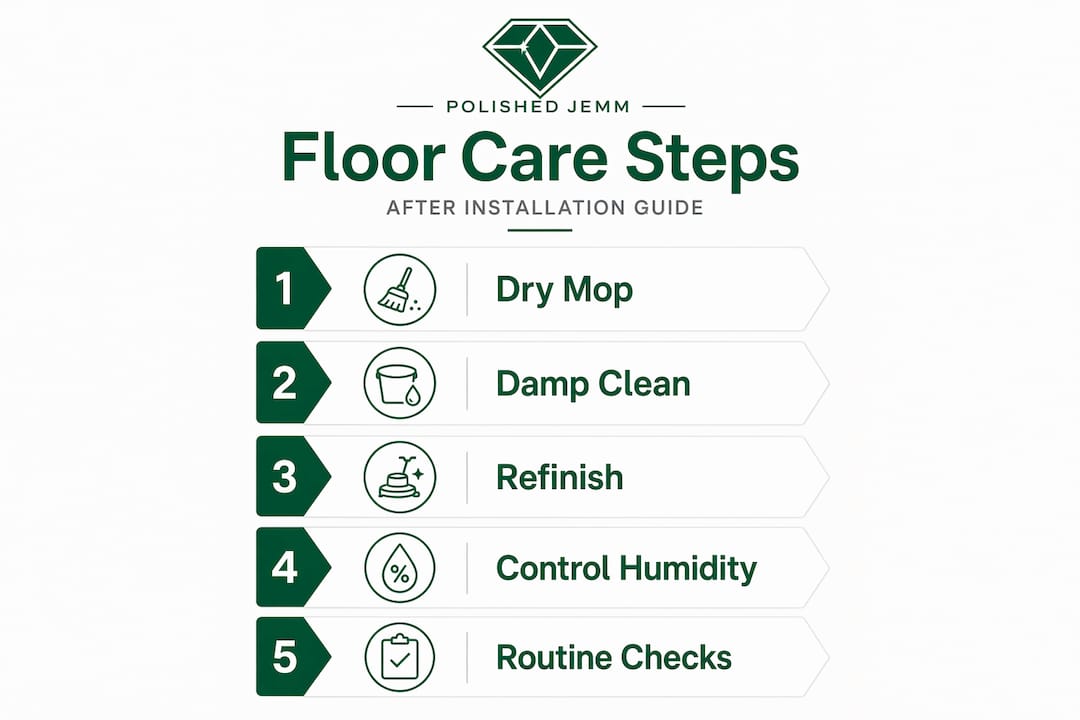
For LVP and laminate, the cleaning routine is similar but more forgiving. Avoid wax-based cleaners, which leave residue that dulls the surface over time.
Signs you need professional attention:
- Deep scratches that expose raw wood below the finish layer
- Cupping or crowning across multiple planks (a moisture issue, not a cosmetic one)
- A finish that has gone dull despite regular cleaning
- Squeaking that was not present at installation
Pro Tip: Hardwood floors typically need professional refinishing every 7 to 10 years depending on foot traffic and finish type. Scheduling a screen and recoat every 3 to 5 years before visible wear sets in extends the time between full sand-and-refinish cycles, and keeps your warranty intact.
Keep interior humidity between 35 and 55% year-round using a humidifier in winter and air conditioning or a dehumidifier in summer. This single habit does more to protect wood floors than any cleaning product on the market.
My honest take on DIY versus professional flooring
I have watched hundreds of flooring projects in residential homes, and the pattern is consistent. Homeowners who attempt DIY hardwood installation and succeed are usually people who have done it before or who took the time to do serious research in advance. The ones who struggle are not lacking effort. They are lacking information at the moment they need it most.
The biggest mistake I see is underestimating the subfloor work. People buy beautiful floors, skip the flatness and moisture checks, and then wonder why their planks squeak or gap six months later. The floor is only as good as what is underneath it.
My practical advice is this: flooring choice is subjective and depends heavily on your room and lifestyle. There is no single best material. But there is a wrong way to install any of them, and that wrong way almost always starts with poor preparation.
If you are doing this for resale, hire a professional for hardwood and do not cut corners on the finish. Buyers notice floors immediately. If you are upgrading for your own long-term enjoyment, a hybrid approach works well. Handle the demo and the cleanup yourself, then bring in professionals for the installation and finishing. You keep quality high and costs manageable.
The value of a professional warranty is something I cannot overstate. When a licensed installer puts down your floors, any failure within the warranty period is their problem to fix. When you install them yourself and something goes wrong, it is entirely your cost to repair.
— Jim
Ready to transform your hardwood floors?
If your hardwood floors have seen better days, professional refinishing is often the most cost-effective path to a like-new surface without the disruption of full replacement. Polishedjemmfloor has been restoring floors across the tri-state area since 2014, using eco-friendly products and proven techniques that bring real depth and durability to every finish.
From a full sand-and-refinish to a One-Day Screen and Recoat, Polishedjemmfloor offers services built around what your floors actually need. Explore the hardwood refinishing guide to see exactly what the process looks like, or check the refinishing cost breakdown to build a realistic budget before you call.
FAQ
What flooring material is best for high-traffic areas?
Porcelain tile and luxury vinyl plank are the most durable options for high-traffic rooms. Solid hardwood works well in living areas and can be refinished when it shows wear.
How flat does a subfloor need to be before installing new flooring?
Subfloors must be flat within 3/16 inch over 10 feet. Gaps beyond this cause planks to flex and squeak, and can void the flooring manufacturer’s warranty.
How much can DIY installation actually save?
On a 500-square-foot project, eliminating professional labor can save $1,500 to $4,000 depending on material and regional labor rates. The trade-off is significantly more time and a higher risk of installation errors.
When should hardwood floors be refinished?
Most hardwood floors benefit from a screen and recoat every 3 to 5 years and a full sand-and-refinish every 7 to 10 years, depending on traffic volume and the original finish type.
Do I need to test moisture before installing flooring?
Yes, especially on concrete subfloors. ASTM F2170 in-situ RH probe testing is the most reliable method and measures moisture inside the slab rather than just at the surface.