Your hardwood floors used to catch the light in all the right ways. Now they look flat, scuffed, and tired, and every pass of the mop just reminds you how much their old luster is gone. Full refinishing feels like overkill for what seems like surface wear, and the cost and disruption can be hard to justify. That’s where screening comes in. Screening hardwood floors involves lightly abrading the top layer of existing polyurethane finish using a floor buffer with sanding screens, typically 100 to 220 grit, to prepare for recoating without removing any wood. It’s affordable, low-dust, and genuinely DIY-friendly when done right.
Table of Contents
- What is screening hardwood floors?
- Tools and materials needed
- Step-by-step: How to screen hardwood floors
- Results, troubleshooting, and maintenance tips
- When to DIY, when to hire a professional
- The overlooked truth about DIY floor screening
- Get expert help for flawless hardwood floors
- Frequently asked questions
Key Takeaways
| Point | Details |
|---|---|
| Screening is surface-only | Screening only affects the floor’s top finish layer, preserving wood and eco-friendliness. |
| DIY process is achievable | With the right tools and steps, most homeowners can screen and recoat their floors themselves. |
| Timing and prep matter | Careful preparation, proper drying, and cleaning before and after screening ensure quality results. |
| Know when to call a pro | Professional help is best for heavy damage or historic floors, while screening is perfect for lighter wear. |
What is screening hardwood floors?
Screening is not the same as sanding. That distinction matters a lot. Sanding cuts down into the wood itself to remove deep scratches, stains, and old finish layers. Screening, by contrast, only roughens the surface of your existing finish to give a new coat of polyurethane something to grip. Think of it like lightly scuffing a painted wall before repainting. You’re not stripping anything. You’re just creating adhesion.
This process is ideal for floors showing:
- Light surface scratches from daily foot traffic or pet claws
- Dullness or a hazy appearance even after cleaning
- Minor finish wear in high-traffic areas like hallways and kitchens
- A finish that no longer repels spills effectively
What screening won’t fix is equally important to understand. Deep gouges, bare wood spots, water stains that have soaked into the grain, or floors that have already been sanded down to minimal thickness need a different approach. For those situations, a proper professional refinishing job is the right call.
“Screening is best for floors with surface wear, not deep damage.” The goal is restoration of the finish, not reconstruction of the wood beneath it.
One of the biggest advantages of screening is the minimal dust output compared to a full sand. Traditional sanding generates clouds of fine wood dust that settle everywhere and require heavy cleanup. Screening, because it only abrades finish and not wood fiber, produces far less particulate. That makes it a genuinely more eco-friendly option for families in Northern New Jersey who want to maintain their homes without filling the air with debris.
Pro Tip: Schedule screening every 3 to 5 years as part of a proactive maintenance routine. Consistent light care like this extends the life of your floors between full refinishings, which is both cost-effective and environmentally responsible. Our refinishing guide covers the full spectrum of care options if you want to see how screening fits into the bigger picture.
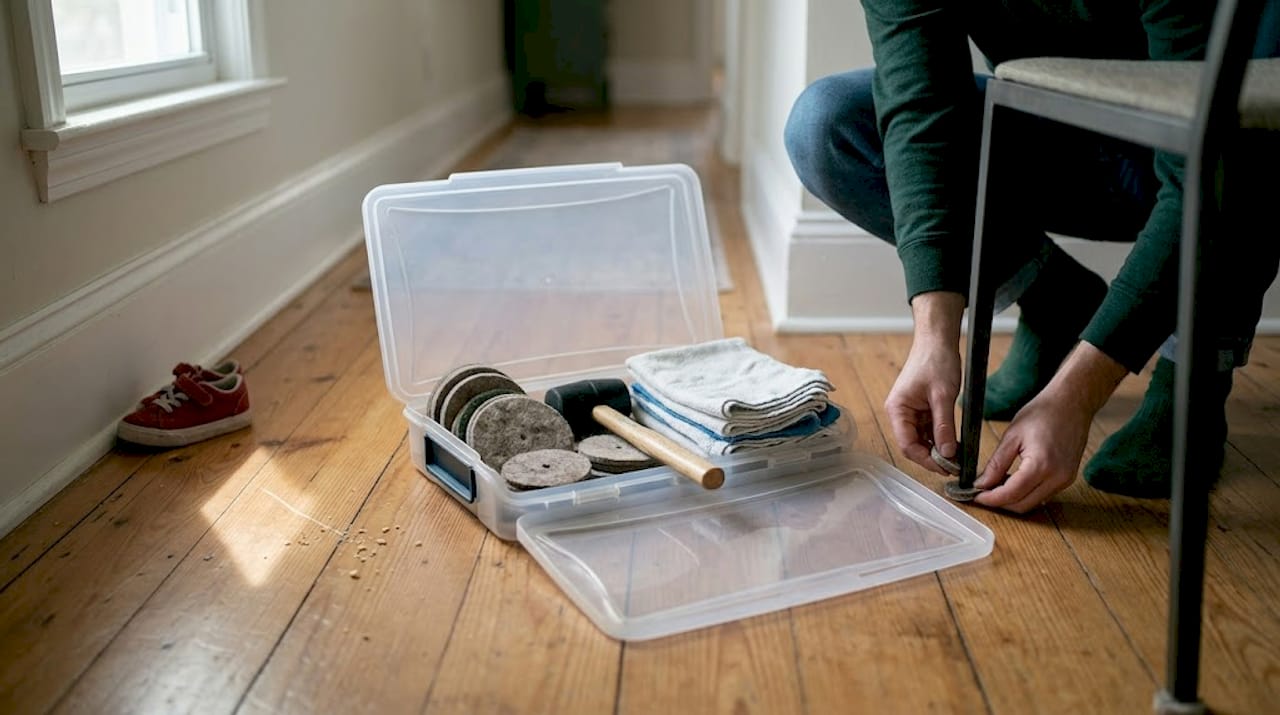
Tools and materials needed
Getting the materials right before you start saves you two trips to the hardware store and a lot of frustration mid-project. Here’s what you’ll need for a complete DIY screen and recoat.
Equipment to rent or buy:
- Floor buffer (also called a rotary buffer or buffing machine), available at most hardware rental shops in New Jersey
- Sanding screens in two grits: 100 to 150 for the initial pass, 150 to 220 for the finishing pass
- Vacuum with a floor attachment
- Tack cloths (sticky cloths that grab fine dust without leaving residue)
- Paint rollers and extension poles for applying finish
- Plastic sheeting to protect doorways and adjacent rooms
Finish and cleaning supplies:
- Water-based polyurethane finish (more on this below)
- Hardwood floor cleaner compatible with polyurethane finishes
- Blue painter’s tape for protecting baseboards
| Item | Purpose | Eco-friendly option |
|---|---|---|
| Sanding screens (100-220 grit) | Abrade existing finish | Reuse screens between passes |
| Water-based polyurethane | New protective topcoat | Low-VOC, fast-drying formulas |
| Tack cloth | Remove fine dust before coating | Washable microfiber alternative |
| Floor buffer (rented) | Power the screening process | Rent locally, avoid purchase waste |
| Plastic sheeting | Contain dust to work area | Reusable poly sheeting |
Water-based polyurethane is strongly recommended over oil-based for a few good reasons. It dries significantly faster, typically 2 to 4 hours between coats compared to 8 or more hours for oil-based. It emits fewer volatile organic compounds (VOCs), meaning better indoor air quality for your family. And it doesn’t yellow over time, so lighter wood species like maple or ash keep their natural color.
Pro Tip: Call your local hardware store before renting a buffer to confirm they stock the right screens. Some locations only carry coarser grits. Renting locally instead of traveling to a big-box store reduces your fuel use and supports the community. Our team at Polished JEMM also offers clean and buff services if you’d prefer to skip the rental process entirely.
According to the DIY screening process guide, the full sequence runs from room prep through cleaning, buffing, vacuuming, and applying 2 to 3 thin coats of finish with 2 to 24 hours of drying time between each coat. Planning your weekend around this timeline means the job gets done right the first time.
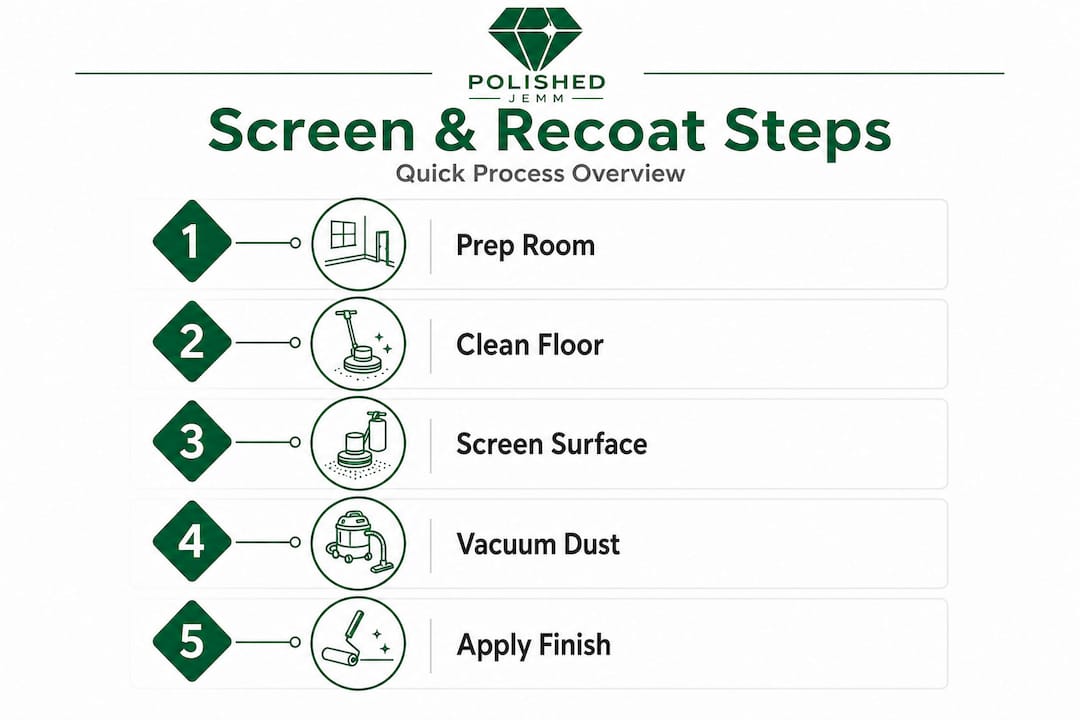
Step-by-step: How to screen hardwood floors
Here is the complete process, broken down in the exact order you should follow it.
-
Clear and prep the room. Remove all furniture, rugs, and décor. Take off any floor registers or floor-level vents. Tape plastic sheeting over doorways to keep dust contained. Protect your baseboards with painter’s tape.
-
Clean the floor thoroughly. Sweep first, then mop with a hardwood-safe cleaner. Any oil, wax, grease, or cleaning residue left on the floor will prevent the new finish from bonding properly. Let the floor dry completely before moving on.
-
Attach the screen and begin buffing. Start with a 100 to 150 grit screen. Buff along the grain, never across it, using overlapping passes to cover the entire floor evenly. Work from the farthest corner back toward the doorway so you’re never trapping yourself in a corner.
-
Switch to a finer grit. After the first pass, switch to a 150 to 220 grit screen and repeat the process. The finer grit smooths out any light scratches left by the coarser screen and gives you an ideal surface for finish adhesion.
-
Vacuum and tack cloth. Vacuum every square inch, including along the walls and in corners where the buffer can’t reach. Follow immediately with a tack cloth to pick up any remaining fine dust. This step is critical. Dust trapped under fresh polyurethane will ruin your finish.
-
Apply the first coat of finish. Pour a small amount of water-based polyurethane onto the floor and spread it with a roller in long, even strokes following the wood grain. Thin coats dry and cure better than thick ones. Let it dry for 2 to 4 hours.
-
Lightly screen between coats. Use a 220 grit screen or a fine abrasive pad to lightly scuff the dried first coat. Vacuum and tack again before applying the second coat.
-
Apply 2 to 3 total coats. Repeat the process. Most floors need 2 to 3 coats for a durable finish. Allow the full cure time of 24 or more hours before light foot traffic.
| Step | Tool needed | Time estimate | Safety note |
|---|---|---|---|
| Prep and clean | Mop, cleaner | 1 to 2 hours | Ensure good ventilation |
| First buff pass | Buffer, 100-150 grit | 1 to 2 hours | Wear dust mask and safety glasses |
| Vacuum and tack | Vacuum, tack cloth | 30 minutes | Dispose of dust safely |
| Finish coats (x2-3) | Roller, polyurethane | 30 min per coat | Open windows, use low-VOC finish |
Safety note: Always wear a respirator mask rated for dust and organic vapors, not just a paper dust mask. Open windows and use a fan to push air out of the room, especially when applying finish. Water-based polyurethane is far safer than oil-based, but proper ventilation is still essential for your health and for an even dry.
Check out our screen and recoat FAQ for answers to common questions that come up mid-project.
Results, troubleshooting, and maintenance tips
When done correctly, a screened and recoated floor looks almost like new. The finish is even, the sheen is consistent across the whole surface, and those surface-level scratches that used to catch the eye simply disappear. Most homeowners are genuinely surprised by how much of a difference this process makes without the cost or disruption of full refinishing.
Timing before use:
- 24 hours: Minimum wait before any light foot traffic, wearing socks only
- 72 hours: Minimum wait before sliding furniture back in
- 7 days: Full cure before placing rugs or using cleaning products on the floor
Common issues and quick fixes:
- Tack marks or sticky spots: Usually caused by applying too thick a coat or not allowing enough drying time between coats. Let it cure fully. If it persists, a light screen and additional thin coat will resolve it.
- Bubbles in the finish: Caused by rolling too fast or shaking the polyurethane container. Apply finish slowly and pour it directly rather than shaking the bottle.
- Peeling or poor adhesion: Almost always caused by inadequate cleaning before application or leftover wax or oil on the surface. The fix requires re-screening the affected area and recoating after thorough cleaning.
- Uneven sheen: Caused by inconsistent application. Use a high-quality roller and maintain even pressure throughout.
Pro Tip: Place felt pads under all furniture legs before moving anything back in. This single habit prevents the majority of surface scratches that bring floors back to dullness in the first place. For ongoing cleaning, use a pH-neutral, eco-friendly hardwood cleaner and avoid steam mops, which can lift finish over time. Our floor care tips section has maintenance advice you can bookmark and refer to throughout the year.
A properly maintained screened floor can last 3 to 5 years before needing another recoat, and significantly longer before requiring a full sand and refinish.
When to DIY, when to hire a professional
Screening is genuinely well-suited to DIY. But knowing its limits keeps you from making a costly mistake on the wrong type of floor.
Good candidates for DIY screening:
- Floors with light surface scratches and general dullness
- Floors that have been refinished before and still have adequate finish depth
- Single-room projects where mistakes are contained
- Homeowners with some comfort around power tools and floor prep
Situations that call for a professional:
- Deep gouges or dents that go into the wood
- Water damage or dark staining from moisture
- Floors that feel soft, springy, or have warped boards
- Historic or specialty wood species that require specific expertise
- Floors where previous DIY work has created uneven finish layers
Critical: If your floor has been waxed or treated with certain oil-based products, a new water-based polyurethane coat will not bond correctly. Screening over a waxed surface can trap the wax under the new finish and cause peeling within weeks. If you’re unsure what your current finish is, do a water test: drop a small amount of water on the floor. If it beads up cleanly, you likely have polyurethane. If it soaks in or leaves a dark spot quickly, call a professional before doing anything else.
For floors that fall outside the DIY-appropriate range, our turnkey floor services cover everything from assessment through final coat.
The overlooked truth about DIY floor screening
Here’s something most online guides won’t tell you directly: the screening step itself is the easy part. What trips up most homeowners is everything that comes before and after it.
The prep and cleaning phase is where DIY jobs fail. Homeowners often rush through the cleaning step because the floor looks clean to the eye. But the buffer doesn’t lie. If there’s any residue from cleaning products, furniture polish, or pet-safe floor sprays on that surface, the new finish will peel within weeks. We’ve seen this pattern more times than we can count in homes across Northern New Jersey.
The other underestimated factor is floor condition assessment. DIY screening works exceptionally well for proactive, regular maintenance, meaning floors that get attention before they deteriorate badly. It works poorly as a rescue operation for neglected floors. If you wait until the finish is completely worn through in spots and bare wood is exposed, screening can’t help you anymore. At that point you’re looking at a full refinish or spot repair, and the cost and disruption are exactly what you were trying to avoid.
The real power of screening is in using it consistently and early. A floor that gets screened and recoated every 3 to 5 years as routine care looks better, lasts longer, and never needs the drastic intervention of full sanding. That kind of proactive mindset is also what keeps floors out of the landfill longer, which matters to a lot of homeowners we work with. Read more about the refinishing benefits that come from staying ahead of floor wear rather than reacting to it.
If the job feels beyond your comfort level or your floors are showing signs of deeper damage, that’s not a failure. It’s just information. Knowing when to call in expertise is good decision-making, not defeat.
Get expert help for flawless hardwood floors
DIY screening can deliver genuinely beautiful results. But there are times when professional equipment, trained eyes, and guaranteed outcomes make all the difference, especially with specialty wood species, older floors, or results that need to last in a high-traffic home.
At Polished JEMM Floor Care, we’ve been refreshing and restoring hardwood floors across Northern New Jersey since 2014. Our One-Day Screen and Recoat services use professional-grade equipment and eco-friendly, low-VOC finishes to deliver a consistent, long-lasting result in a single day with minimal disruption to your household. For floors that need more than a surface refresh, our full refinishing services address deeper damage and restore floors to their original beauty. Not sure which service fits your floor’s condition? Our professional refinishing guide can help you figure out the right next step. Reach out for a consultation and let’s talk about what your floors actually need.
Frequently asked questions
What’s the difference between screening and sanding hardwood floors?
Screening lightly abrades just the top finish layer to prepare it for recoating, while sanding cuts into the wood itself to remove deeper damage and old finish. Screening is faster, lower-cost, and generates far less dust.
How often should I screen and recoat my hardwood floors?
Most floors in active households benefit from screening and recoating every 3 to 5 years, depending on foot traffic, pets, and the type of finish used. Catching wear early makes each job easier and less expensive.
Can I use oil-based polyurethane instead of water-based?
Both options can provide a durable finish, but water-based polyurethane dries significantly faster between coats and emits fewer VOCs, making it the more practical and eco-friendly choice for most DIY homeowners.
How do I know if my floor is suitable for screening?
If your floor shows surface dullness or light scratches but no deep dents, bare wood spots, or water staining, screening is likely suitable and will deliver noticeable results. Visible bare wood or soft, springy boards are signs you need professional assessment first.
How long after recoating can I walk on my floors?
Allow at least 24 hours of curing before light foot traffic in socks, 72 hours before moving furniture back, and a full 7 days before placing area rugs or using any cleaning products on the fresh finish.